Mode 1: Register
7. Mode 1 — Register New Bot
Use this mode the very first time you set up a bot. You only do this once per bot.
What you need ready:
- Your bot token from BotFather (from Create Your Bot).
- A private Telegram channel you created (from Create Your Channel) — do not add the bot to it yet.
- Your folder of files ready on your computer.
Bot must not already be registered elsewhere
If your bot token was ever connected to another Telegram bot management service (such as Livegram, Manybot, or similar), you must revoke that token in BotFather and create a fresh one before using Rufoof. Conflicting webhooks from other services will prevent your bot from working.
Telegram bot limit
Telegram allows a maximum of 20 bots per account (or 40 bots with a Telegram Premium subscription). If you have reached this limit, you must delete an existing bot in BotFather before creating a new one.
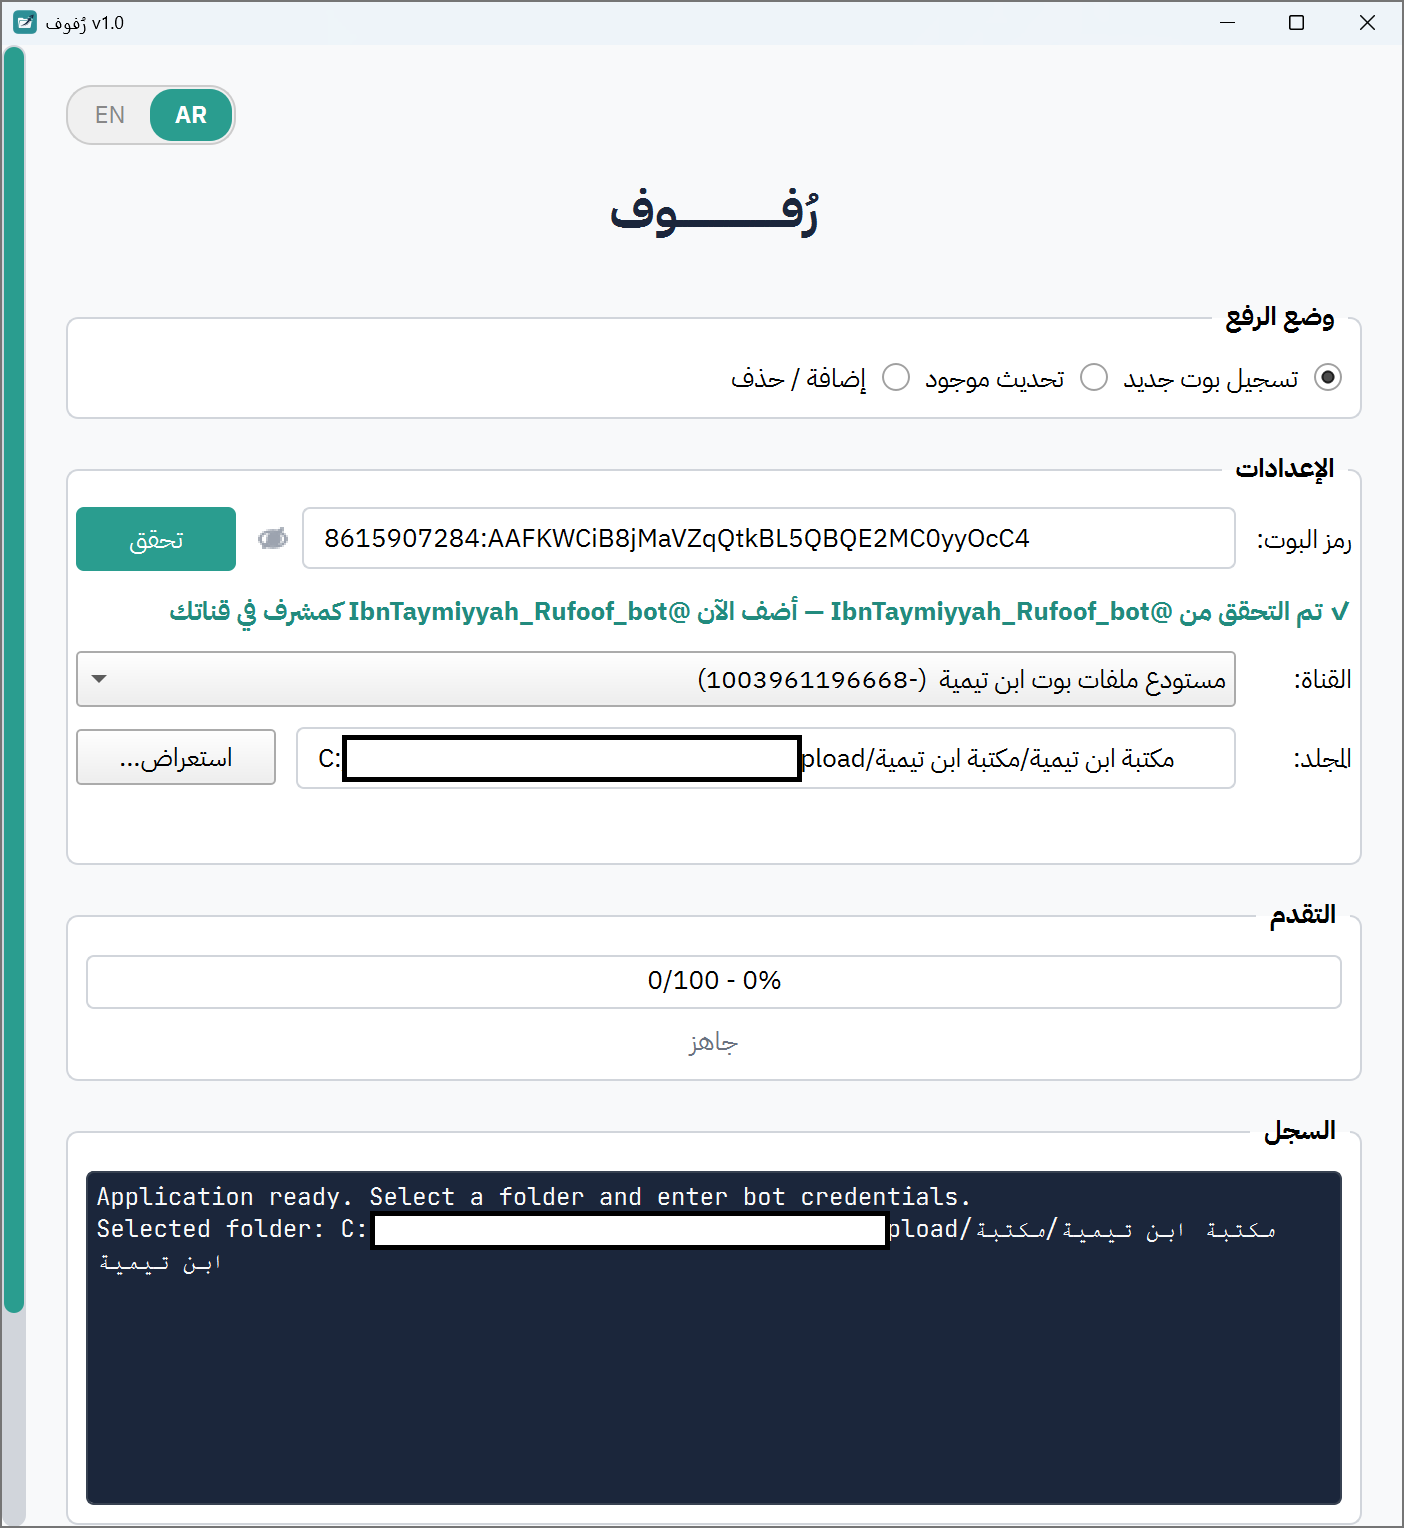
Step 7.1 — Make sure Register New Bot is selected at the top (it is selected by default when you open Rufoof).
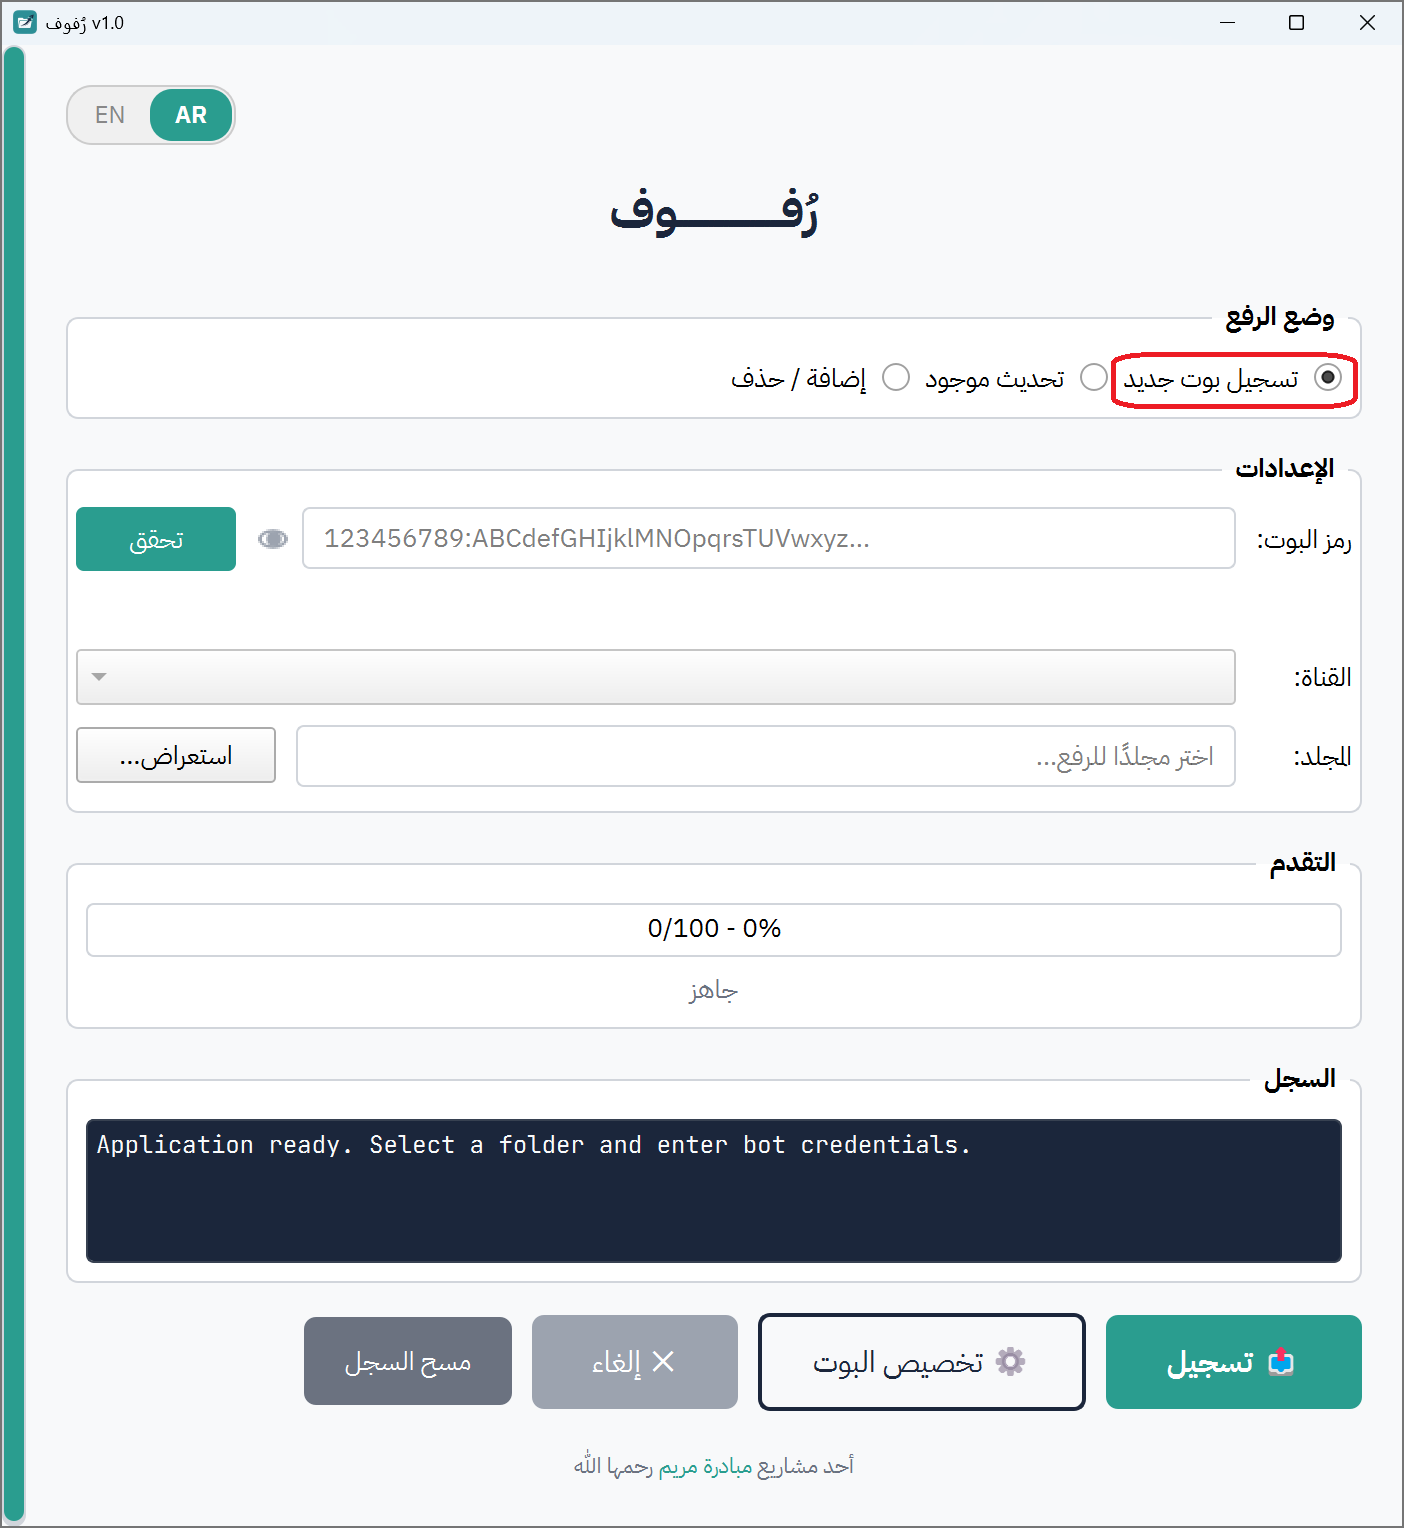
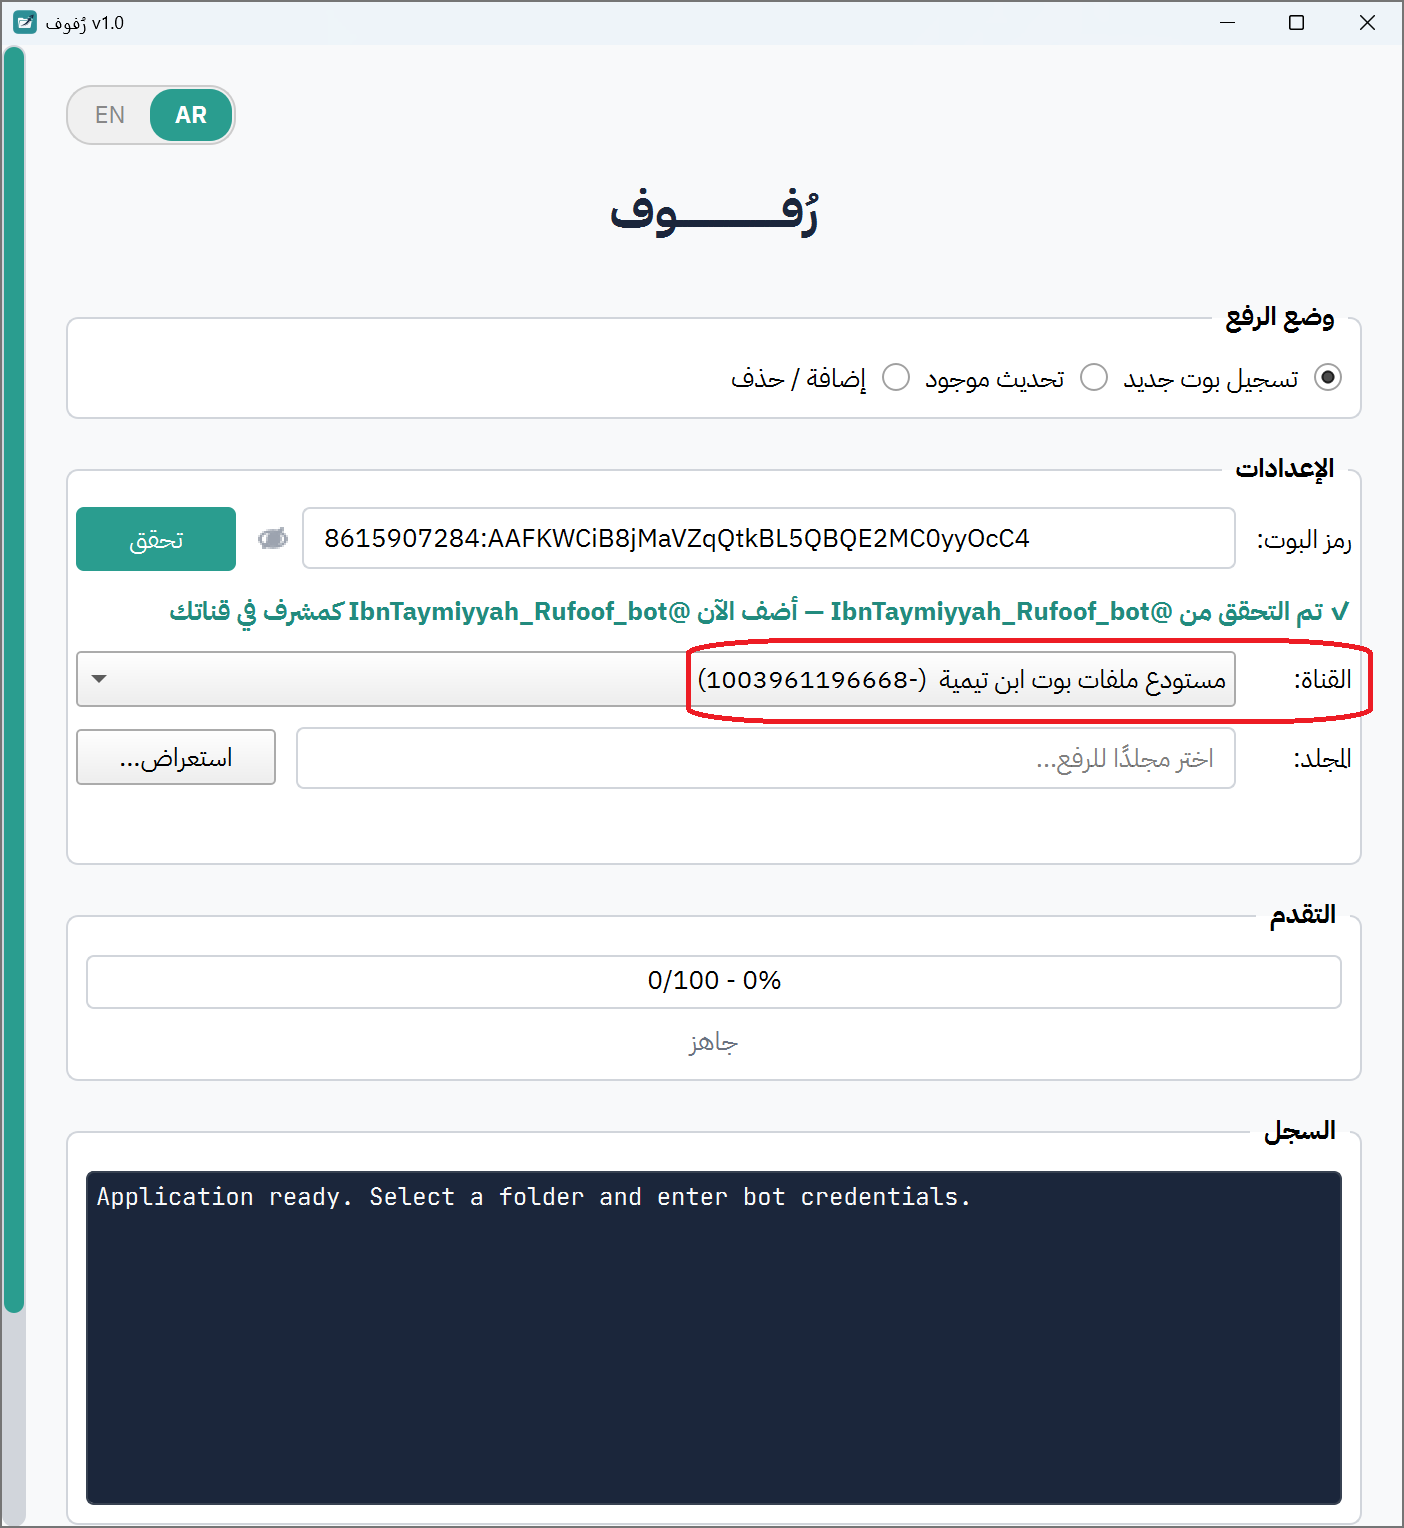
Step 7.2 — In the Bot Token field, paste your bot token. The token will be hidden as dots for security. To reveal it, click the 👁 eye icon next to the field.
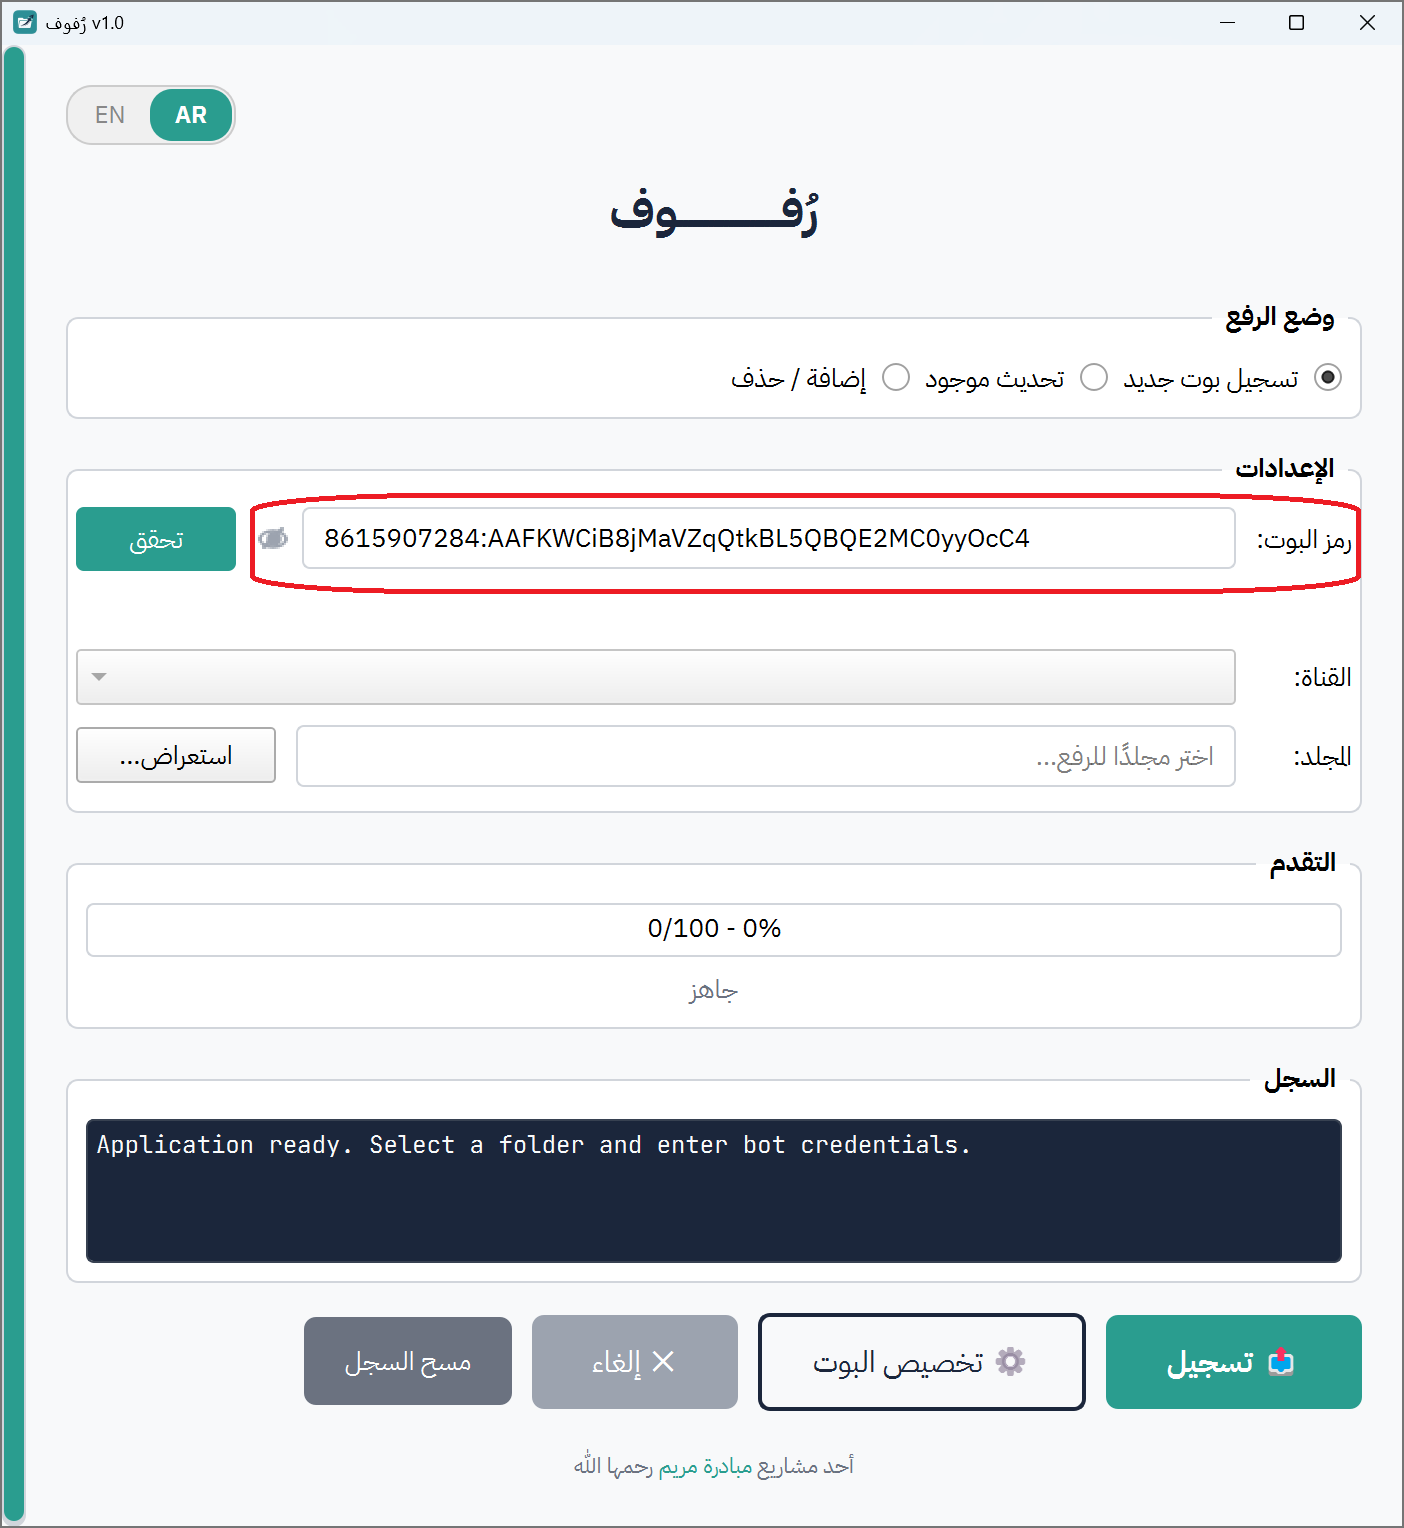
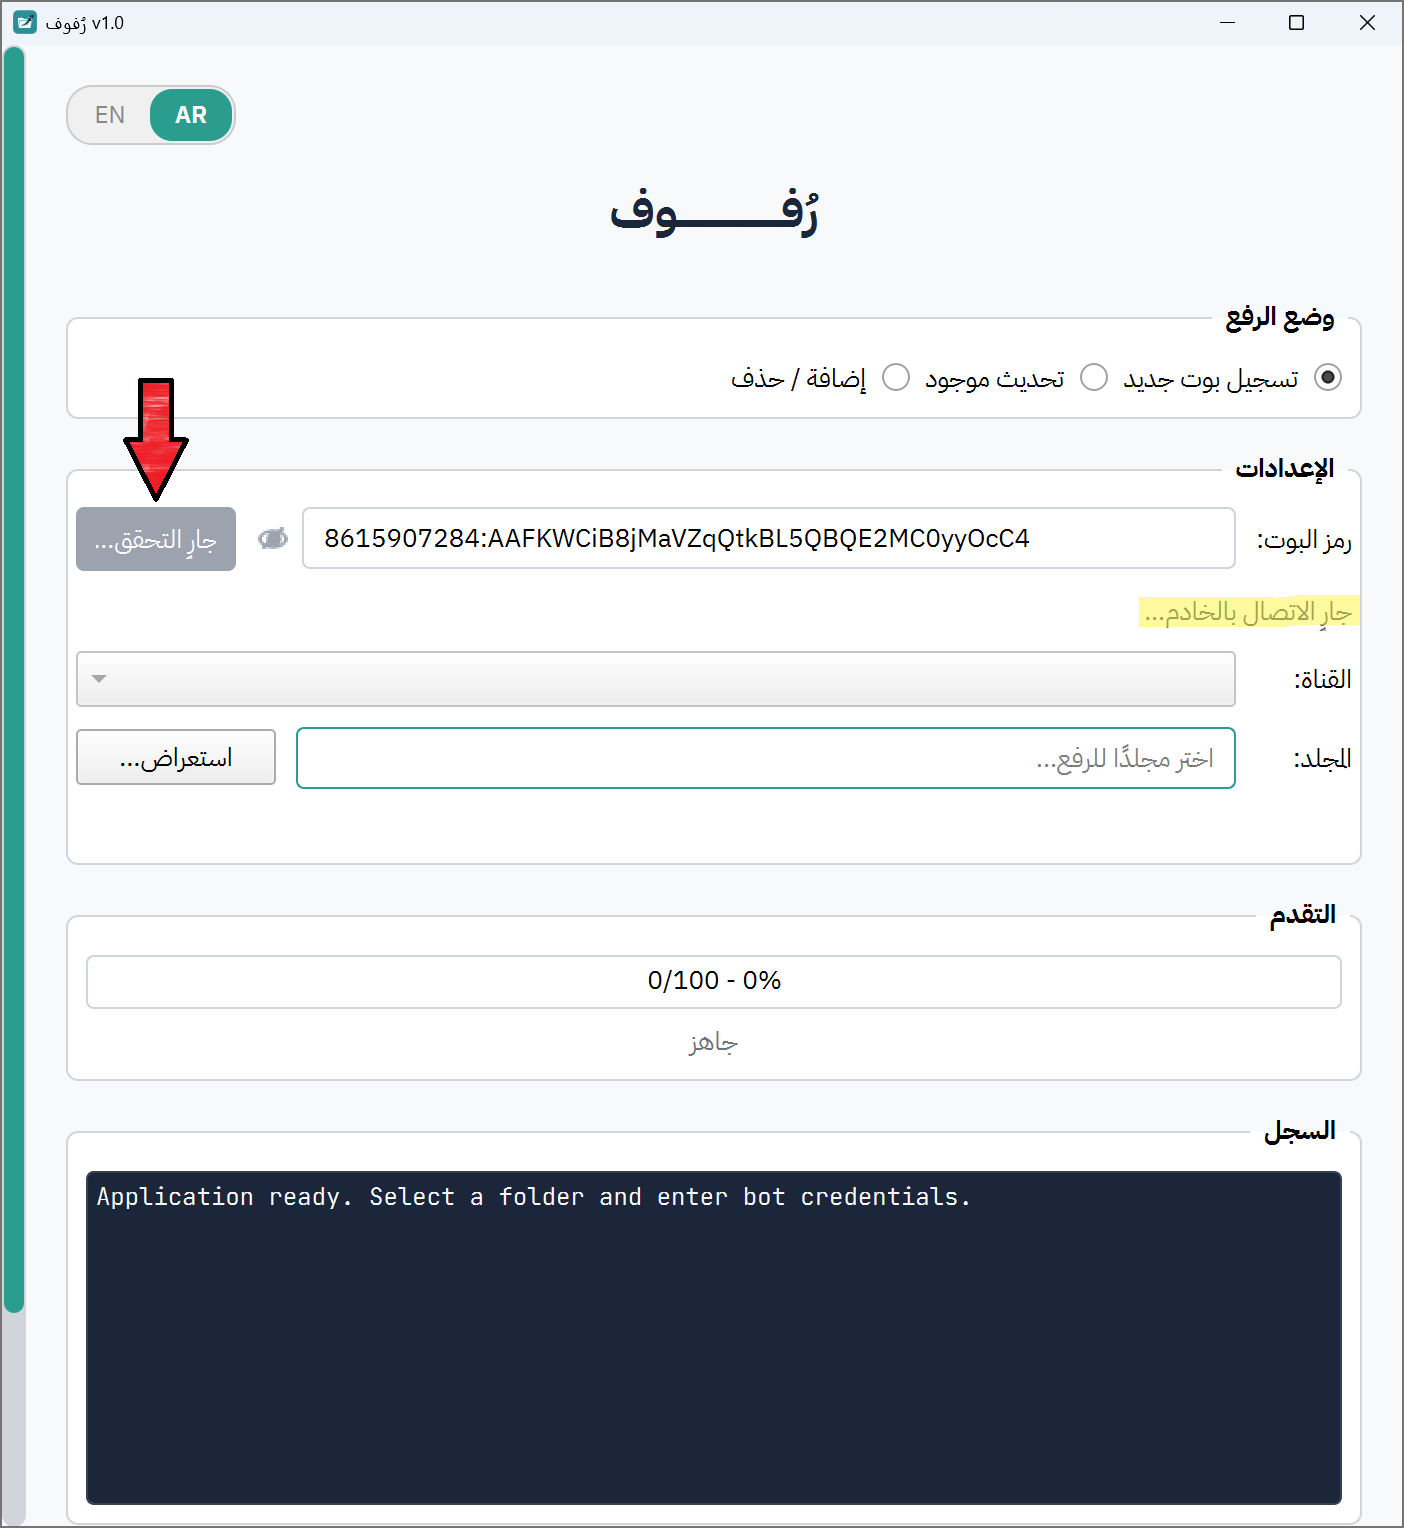
Step 7.3 — Click the Validate button. Rufoof will contact the system to verify your token. Button name will change to "Validating ...".
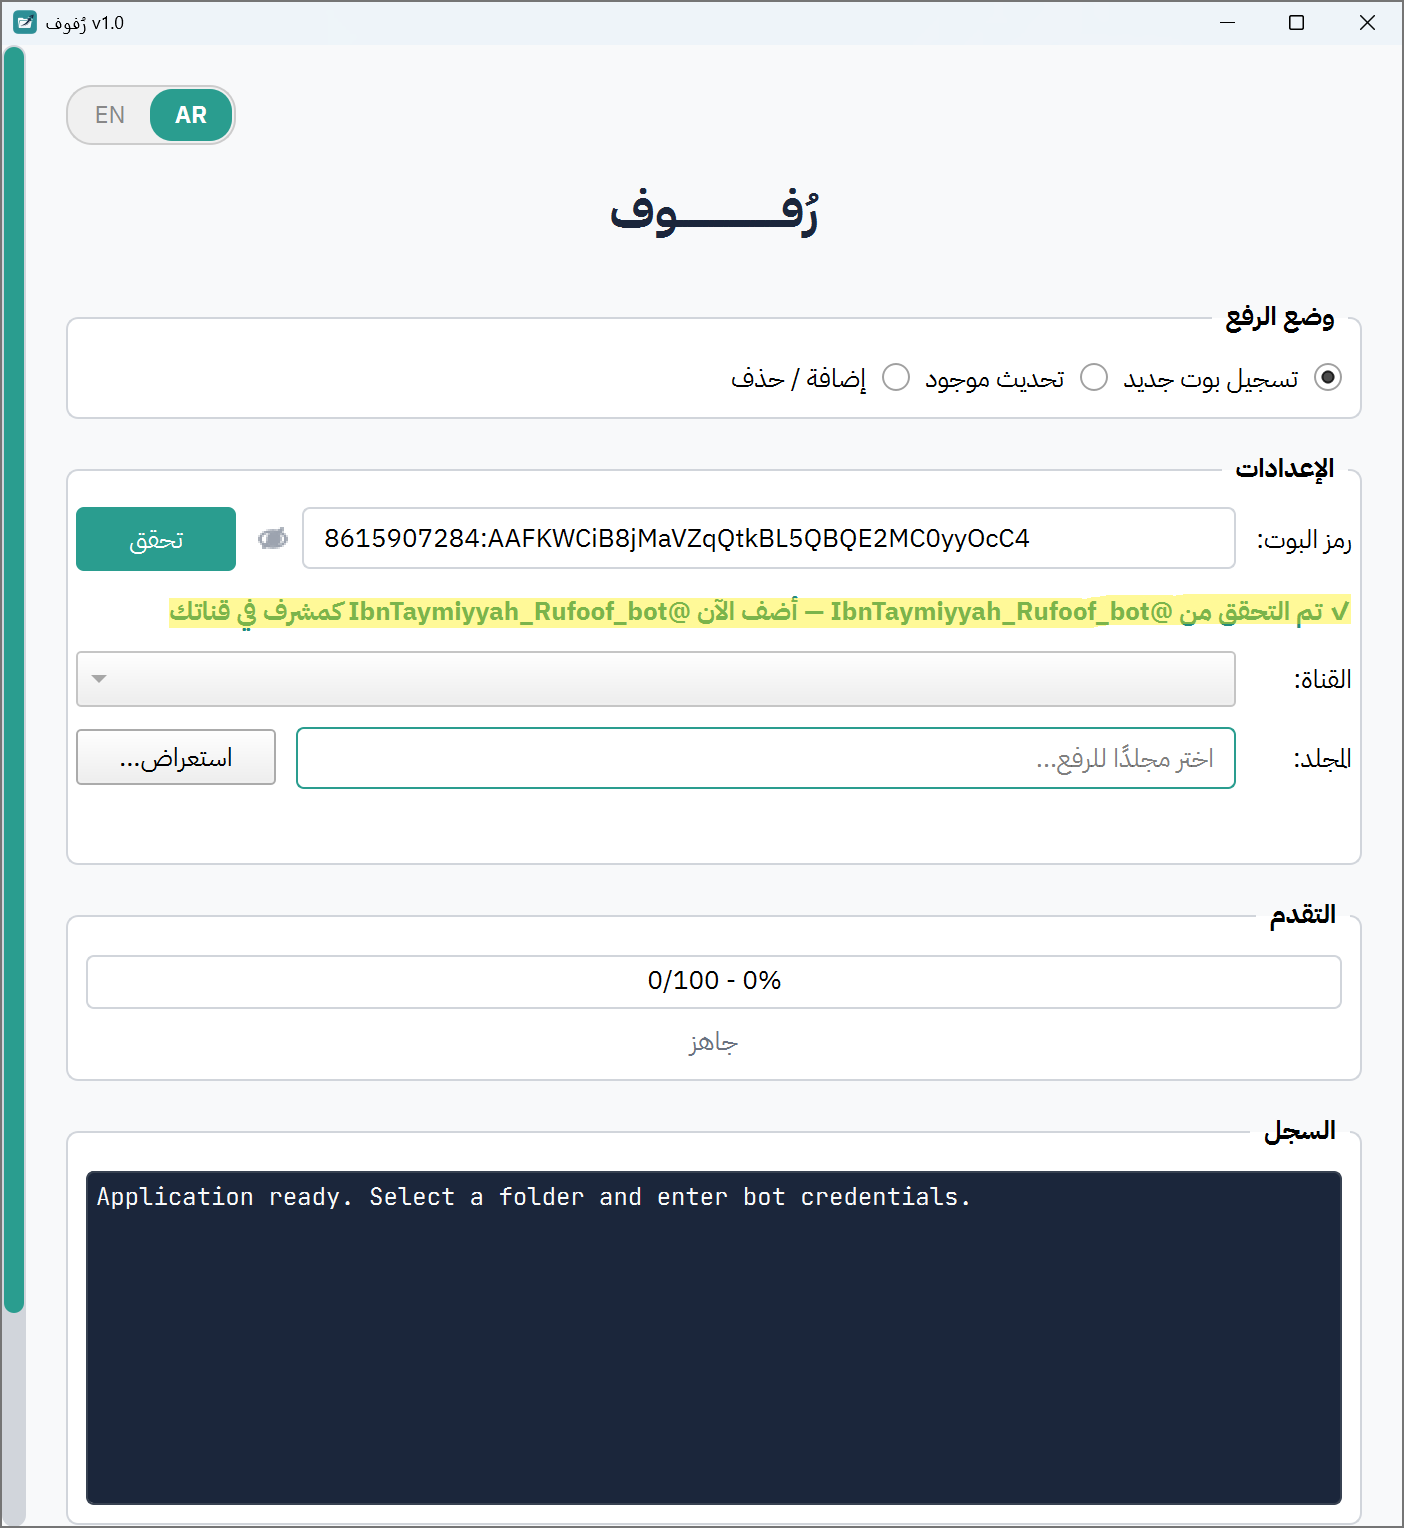
What happens next: Rufoof checks the token and, if it is valid, shows a green message below the token field:
✓ MyBotName validated — now add MyBotName as admin to your channel
If you see a red error instead
⚠ Invalid token format— double-check what you pasted. The token should look like123456789:ABCdef...⚠ This bot is already registered. Use Update Existing mode.— your bot has already been set up. Switch to Mode 2.- Any other error — check your internet connection and try again.
Important — timing matters
Rufoof only detects your channel if the bot is added as admin after clicking Validate and seeing the green message above. If you added the bot to the channel before this step, Rufoof will not detect it. See the troubleshooting tip below if this happens.
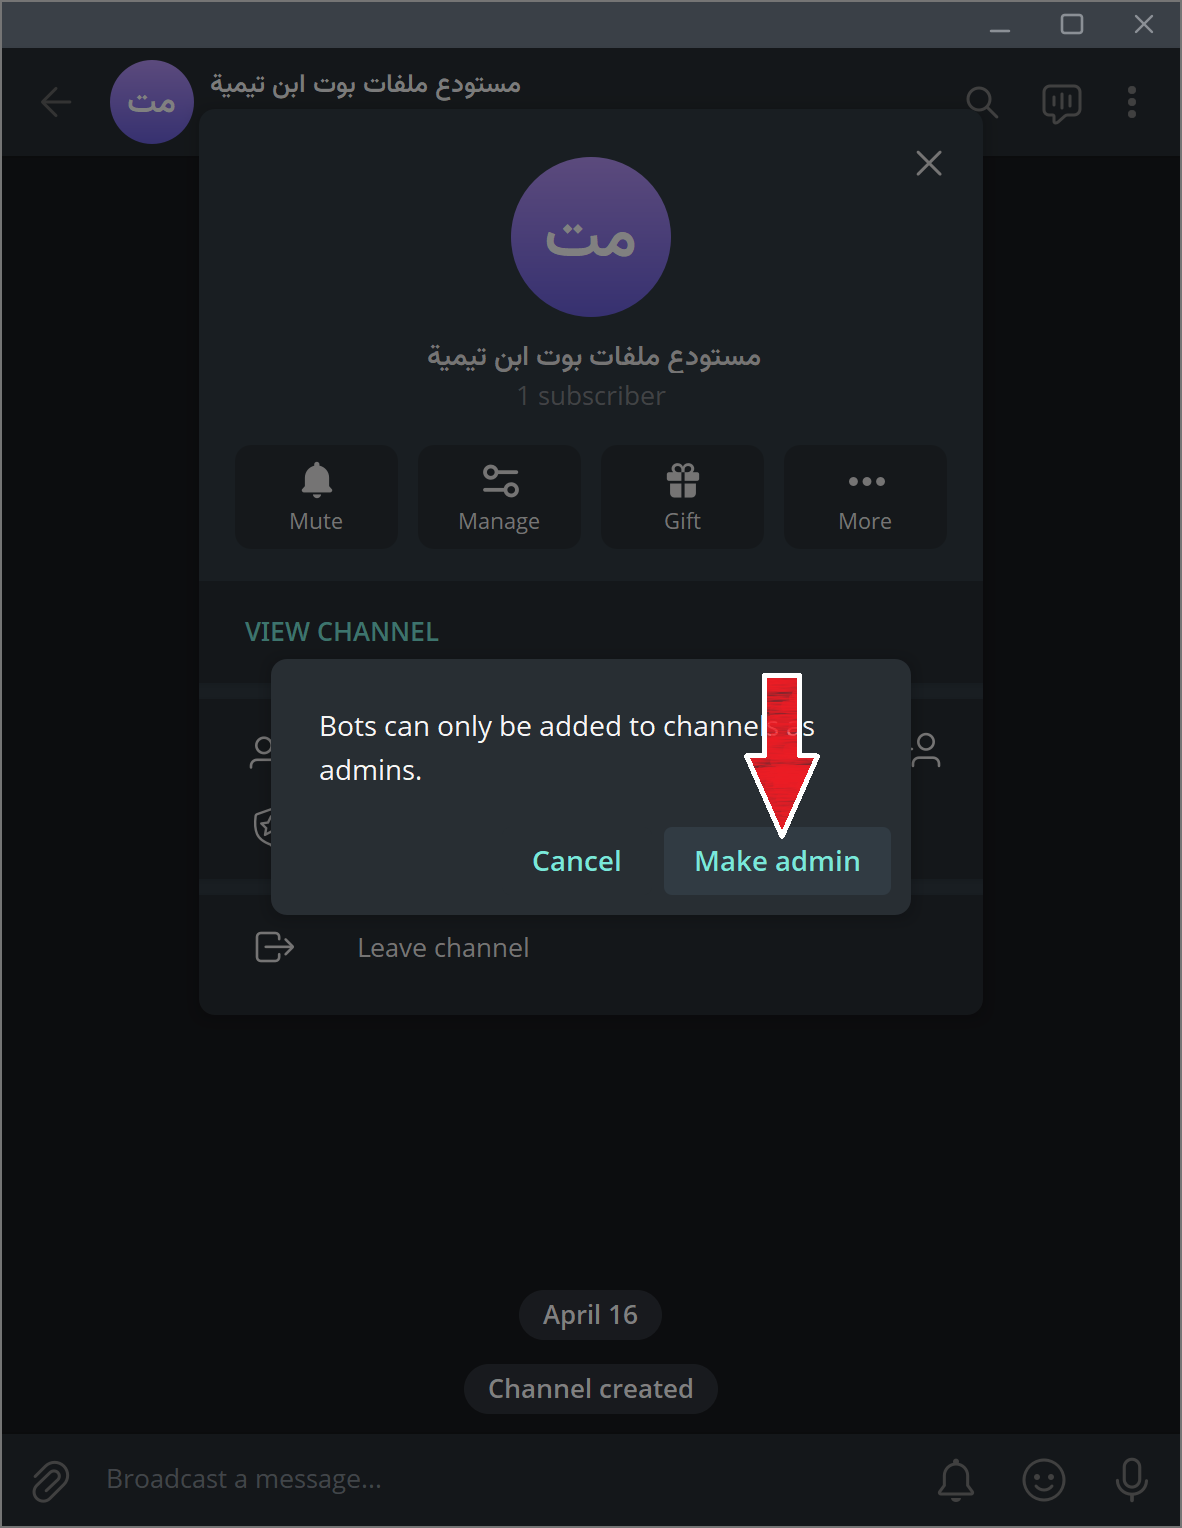
Step 7.5 — Now open Telegram, go to your private channel, and add your bot as an administrator.
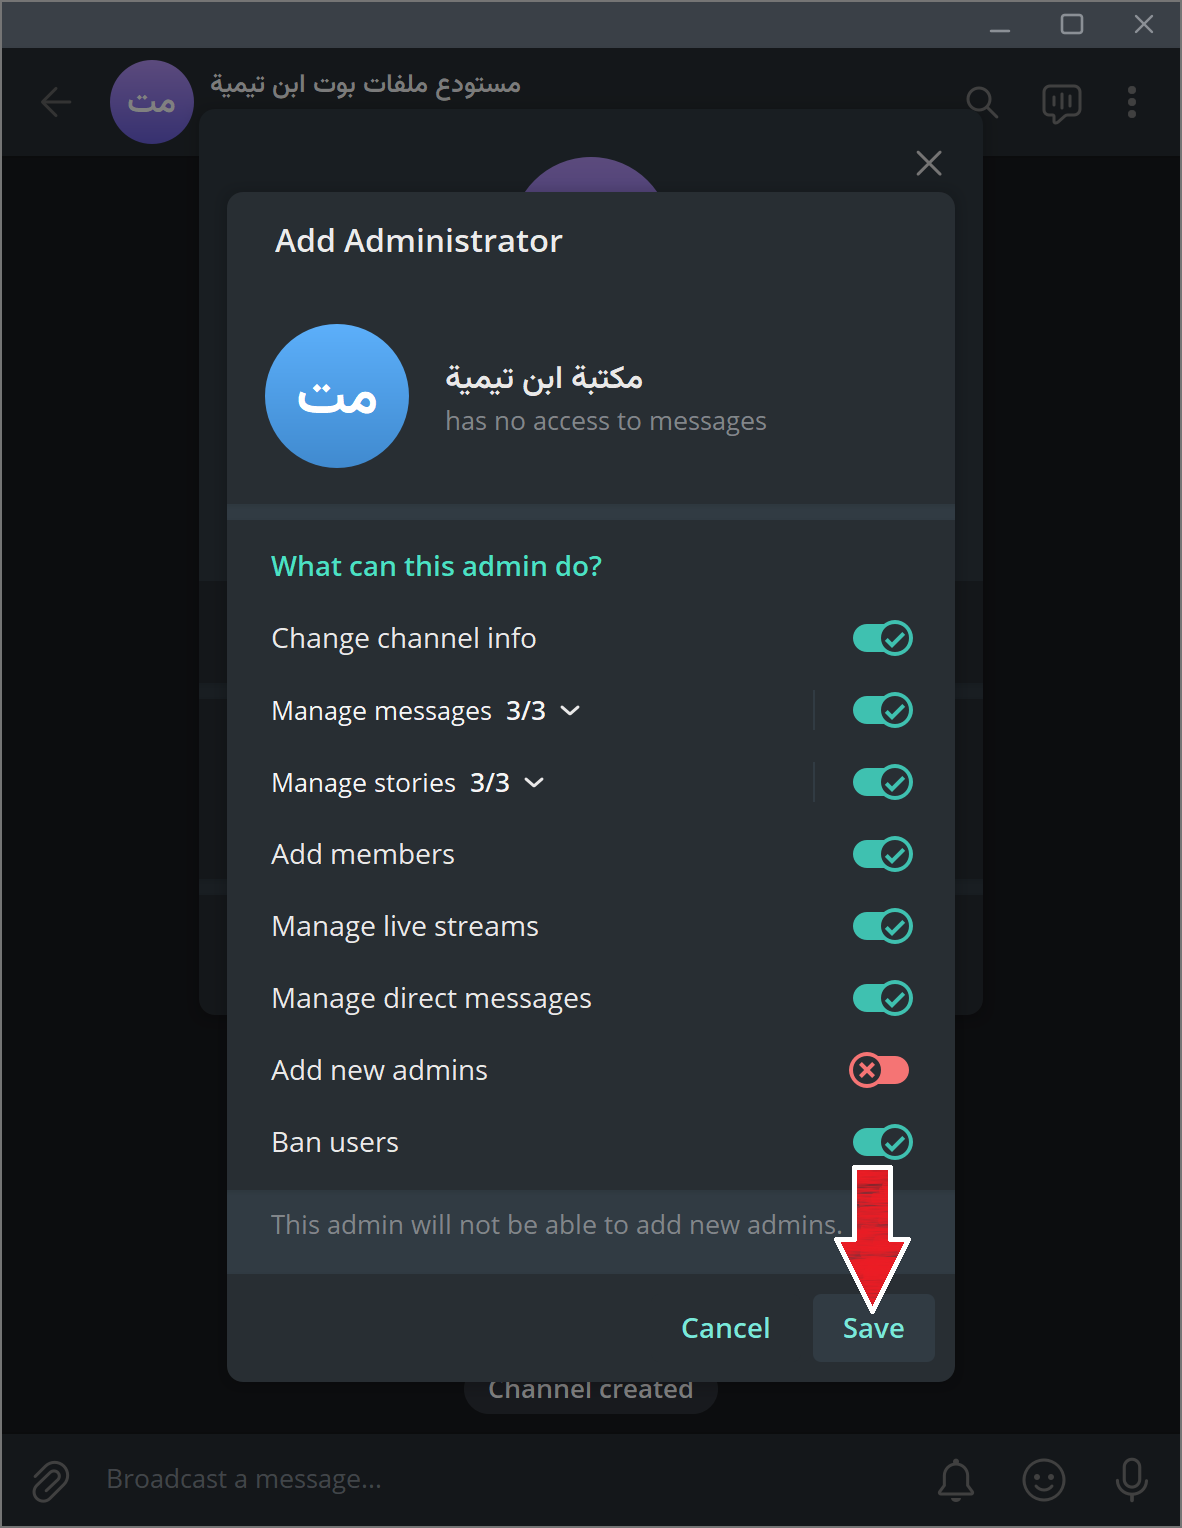
Open your channel → tap the channel name → Add Subscriber Button → search for your bot's username → tap it, Add → Add Admin → leave the default permissions as-is → tap Done.
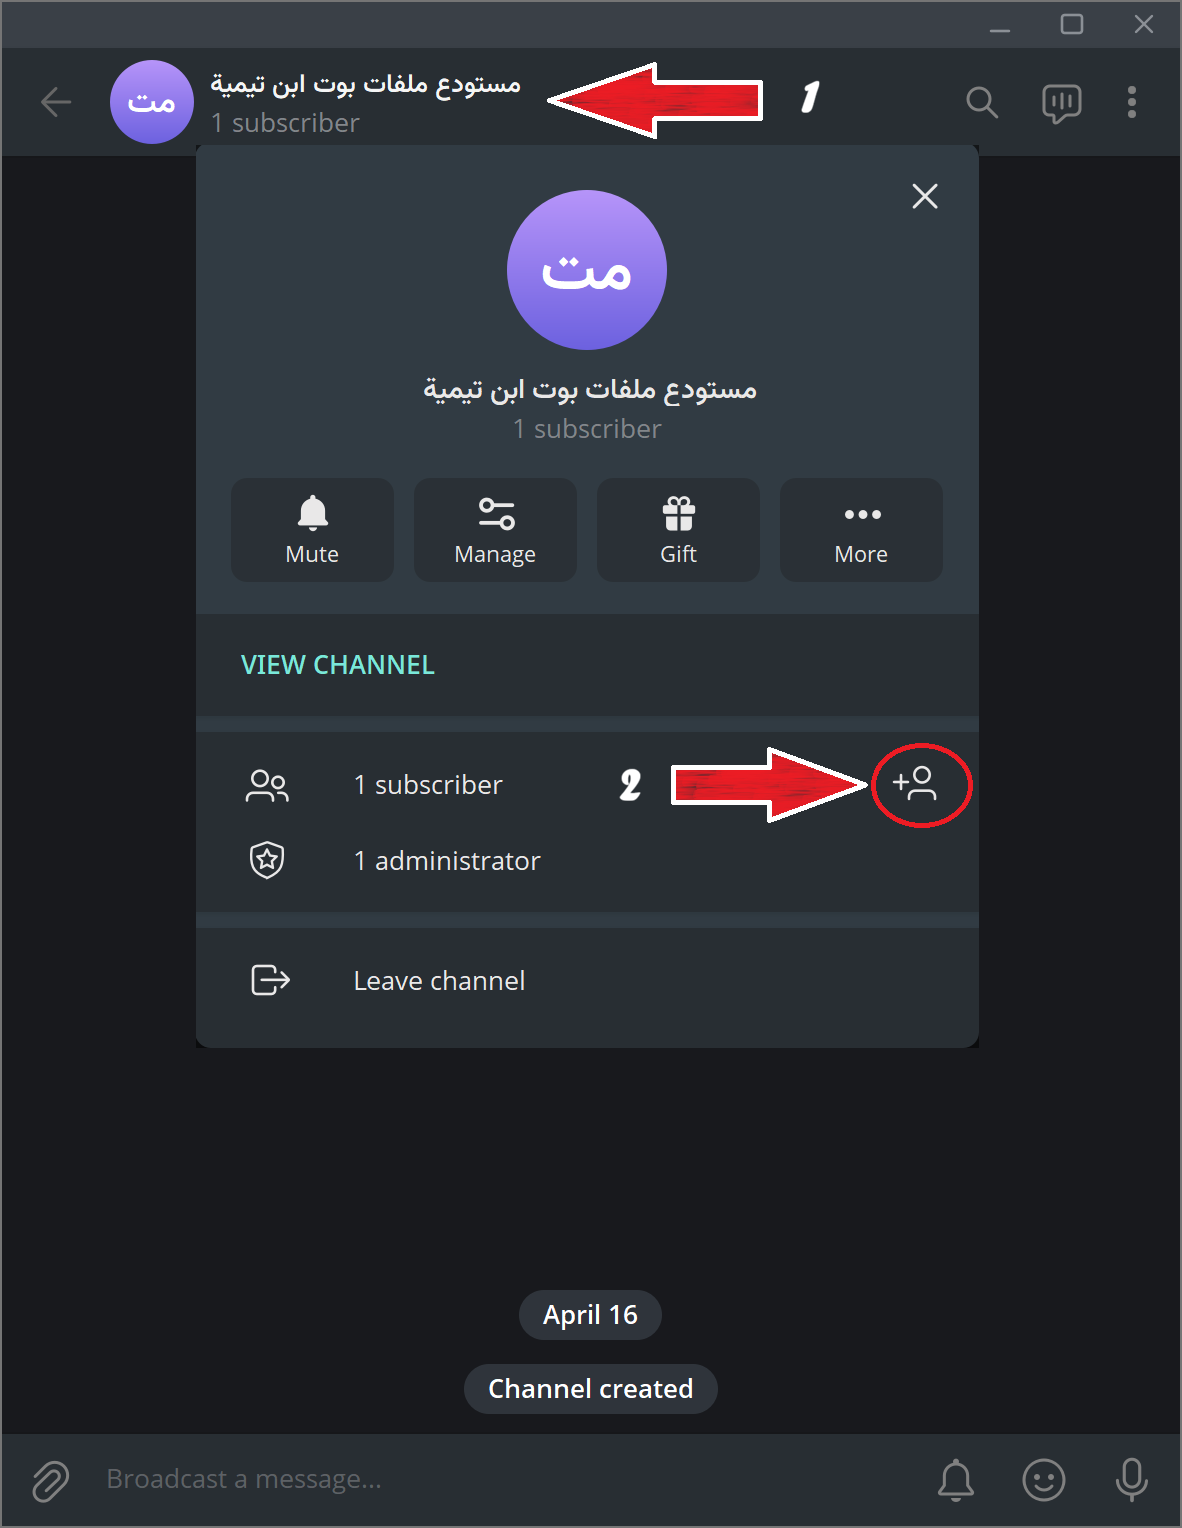

Step 7.6 — Switch back to Rufoof. Within a few seconds, the Channel dropdown will populate automatically with your channel.
If the channel does not appear after 30 seconds
Remove the bot from the channel in Telegram, then re-add it as admin. The detection only works for the moment the bot is added — re-adding triggers a fresh event that Rufoof catches. Also make sure the correct bot (matching the token you entered) is the one you are adding, not a different bot. Make sure you're adding the bot to a channel, not a group.
Session Timeout
The channel detection session is active for 5 minutes after clicking Validate. If the channel does not appear within that time (for example, if you step away), click Validate again to start a fresh session before proceeding.
Step 7.7 — Still in Rufoof, click Browse... next to the Folder field and select the folder on your computer that contains your files.
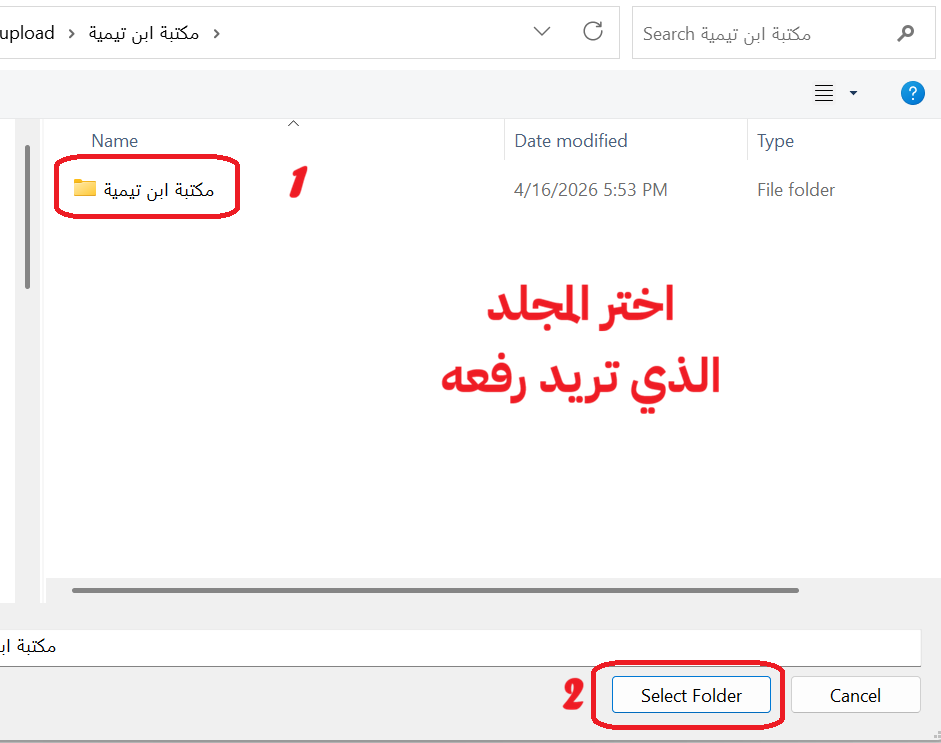
After selecting, the folder path will appear in the field.
Step 7.8 — Click the 📤 Register button at the bottom.
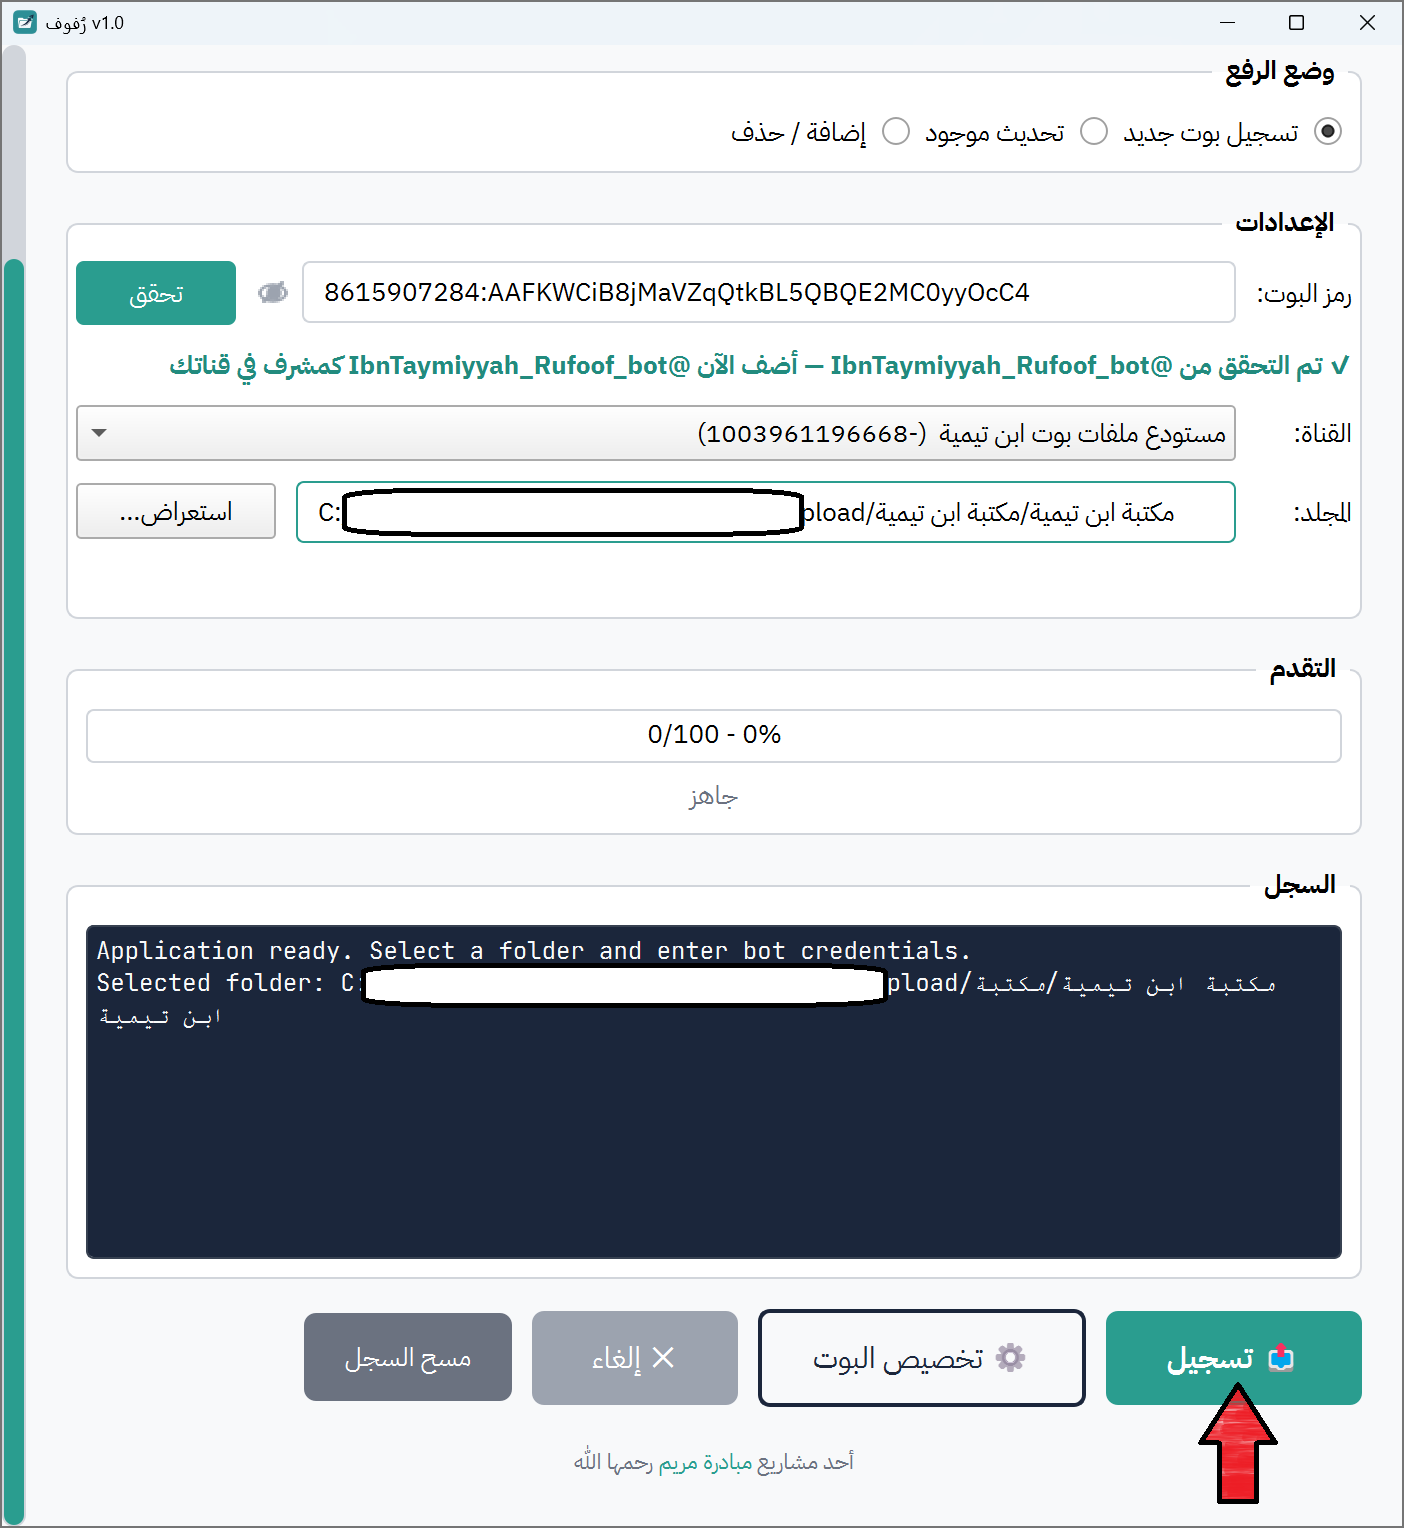
Rufoof will now scan your folder and begin uploading your files to Telegram, one by one. You can watch the progress bar and the log area for real-time updates.

What if some files are too large (over 50 MB)?
If Rufoof detects files larger than 50 MB, it will pause and show you a dialog:
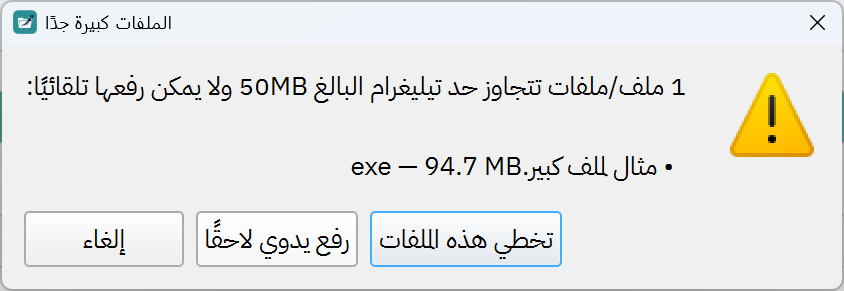
You have three choices: - Abort — Cancel the entire upload. Nothing is saved. - Skip These Files — Continue the upload and simply leave out the oversized files. They will not appear in your bot. - Upload Manually After — Continue the upload, and at the end Rufoof will guide you through adding those large files manually by uploading them directly to your Telegram channel and pasting the message link back.
What if a folder has too many items (100 or more)?
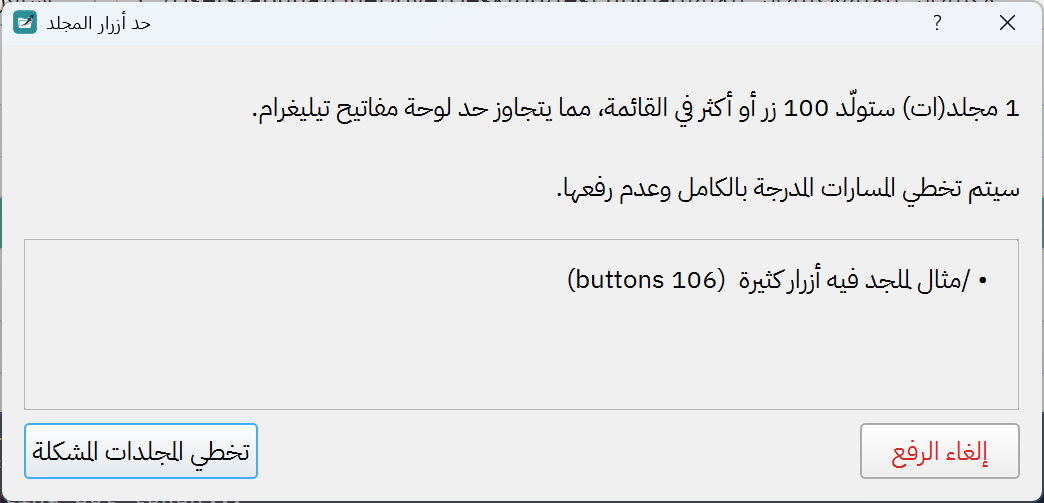
Rufoof will tell you which folders have too many items to display in a Telegram keyboard. You can: - Abort Upload — Cancel completely. - Skip All Problematic — Continue the upload, skipping only the overloaded folders. The rest of your content will still be uploaded.
After the Upload Finishes
When the upload completes successfully, a window will appear to re-order your buttons. Drag the buttons into the order that you like (you can change this order later on if you want to ), and click Save. A dialog will pop up:
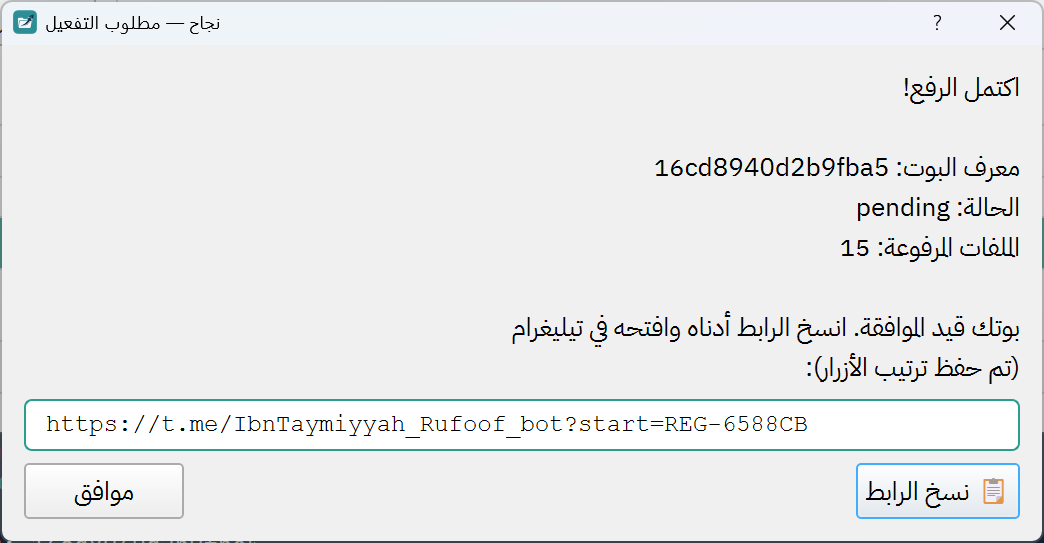
This dialog contains your Bot ID and a special activation link. Do not close this dialog until you have completed the next steps.
Step 7.9 — Click 📋 Copy Link to copy the activation link.
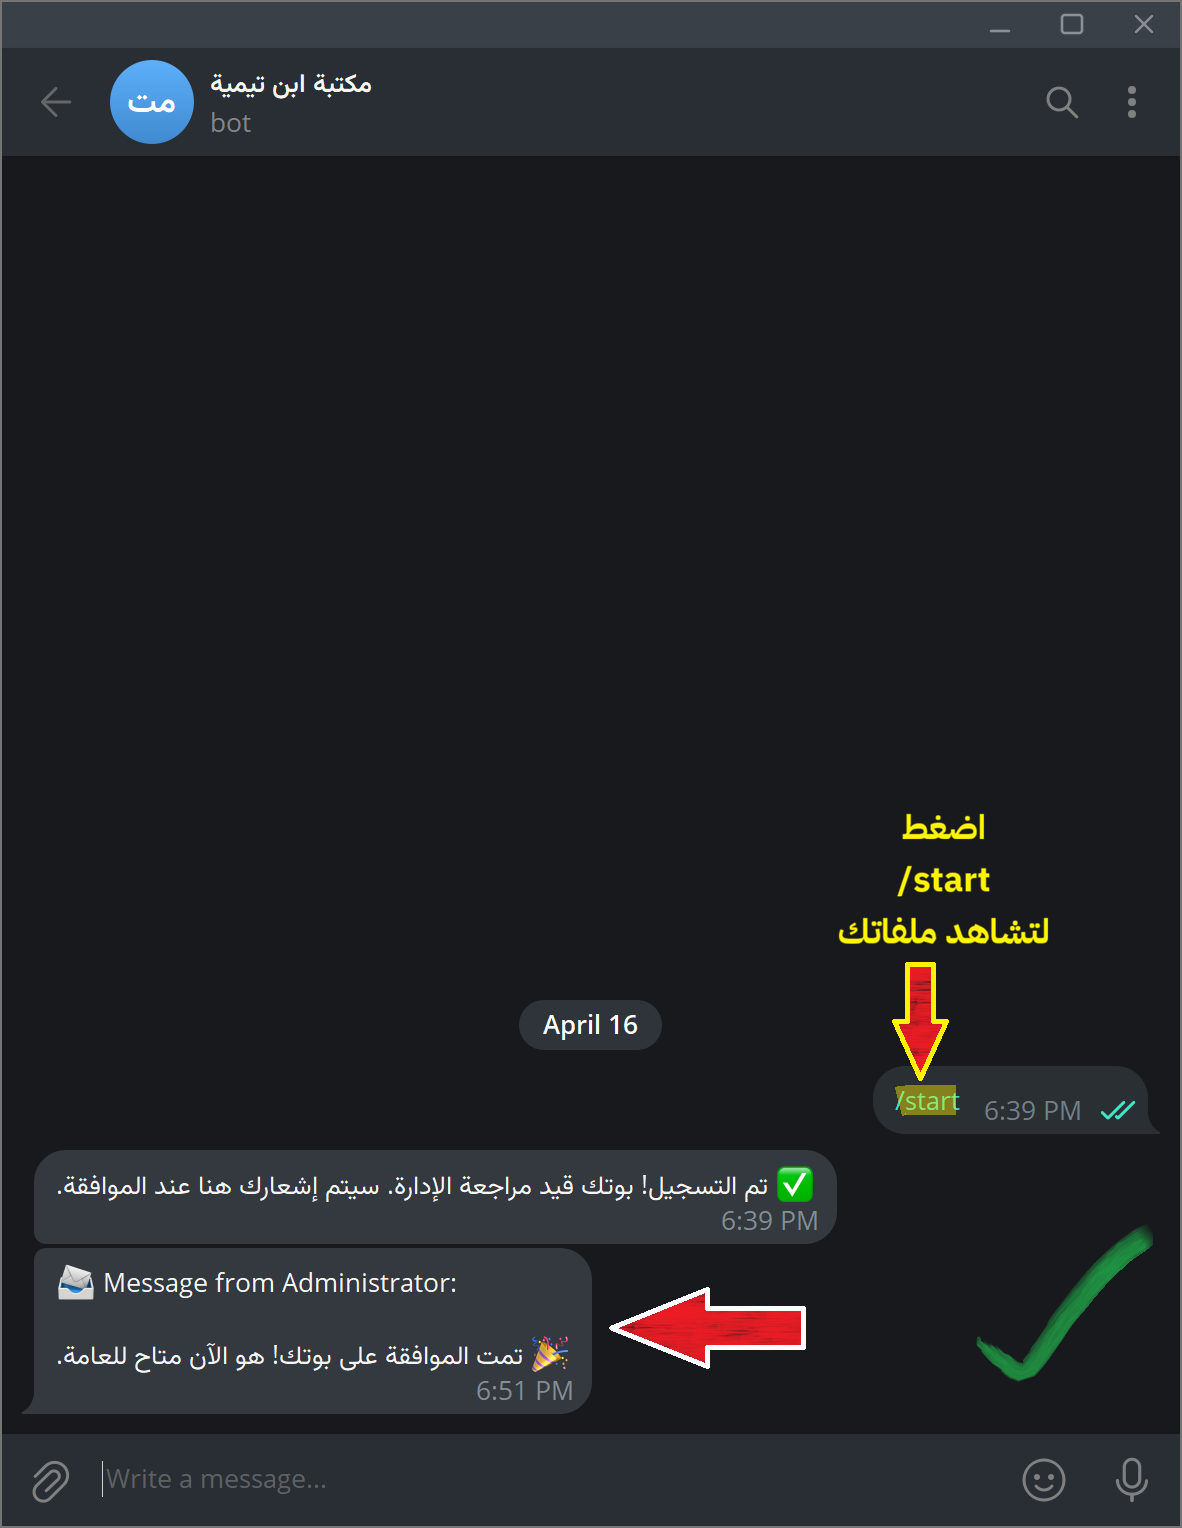
Step 7.10 — Open your private files channel in Telegram, send the link there as a message, then tap it. This will open your bot, click Start.
Step 7.11 — Your bot will confirm that you have registered as its owner.
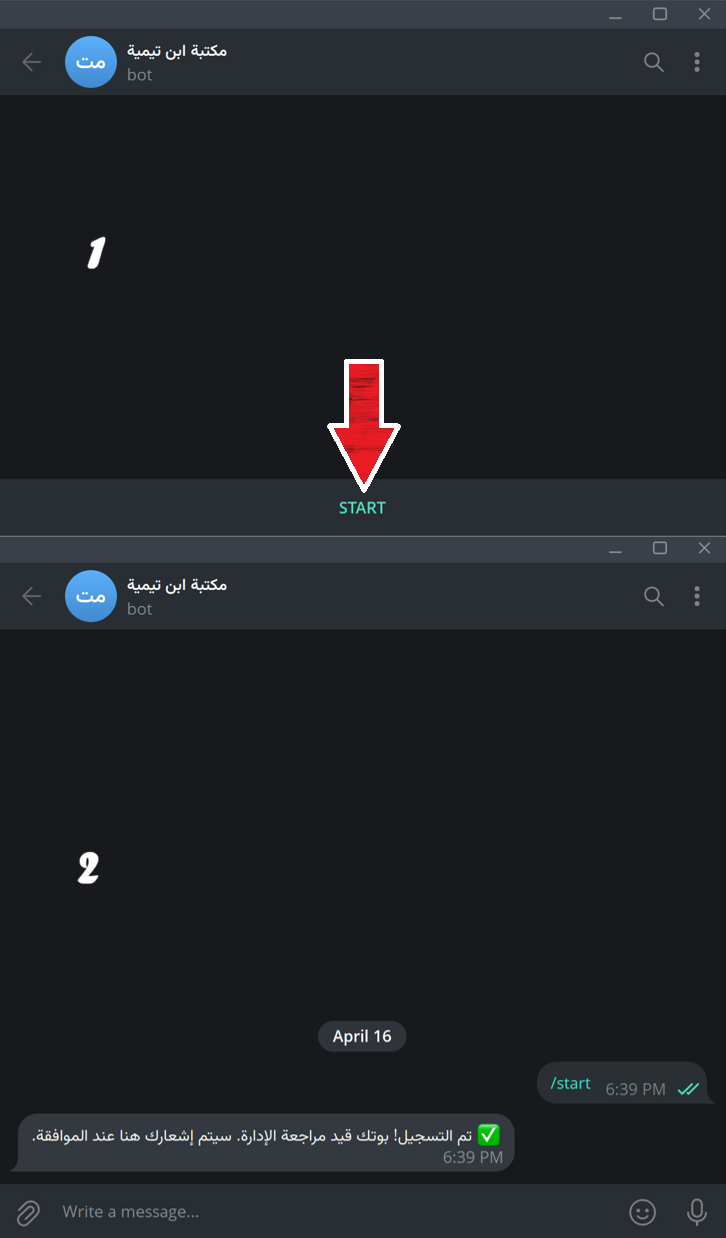
At this point, your bot's status is Pending. This means the Mariam Initiative team needs to review and approve your bot before it goes live for users.
Approval typically happens within a few hours.
Closed Rufoof before copying the link?
The activation link will be written in the Logs - the black window below the progress bar. If you can't find it there: Switch to Update Existing mode and re-run the upload with the same folder. If the files have not changed, the system will remember you have not registered yet and show the link dialog again — but only after a 1-hour waiting period (the server caches identical uploads for 1 hour to avoid duplicates). To skip the wait, make any small change to a file in your folder (rename one, add a blank file) before running Update mode.
Lost your registration code entirely? Contact Mariam Initiative support at t.me/blessed_tree.
Step 7.12 — Once your bot is approved, it will automatically send you a notification message through Telegram confirming that it is now active.
Your bot is now live! Your users can find it by searching @the_username_you_chose_for_the_bot in Telegram.